Color
Management and Adobe Photoshop
Module
Objective: At completion of this module you will be able
to set-up and use Adobe Photoshop for managing color. You will also
be able to use profiles
in an ICC color
managed workflow within Adobe Photoshop.
OK, so now
you know how to calibrate and profile your monitor, calibrate and
profile your scanner and create a custom profile for your printer.
It's time to put this all together. How do we use these profiles
to manage color? Adobe
Photoshop is the image editing and processing application of
choice for just about anyone that is serious about working with
digital images. This module will cover a suggested starting point
for color settings in Adobe Photoshop, something called soft proofing
and printing to an inkjet printer via Photoshop.
Tools:
- Apple
G5 Computer OS 10.4.2
- Adobe
Photoshop CS2
Photoshop Color Settings
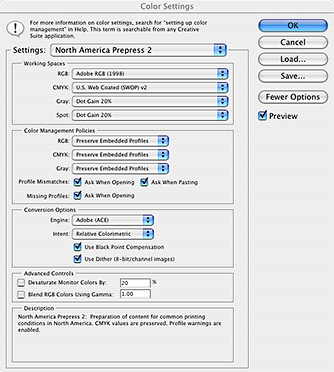
The
screen capture to the left outlines recommended settings for
Photoshop. The Photoshop color settings dialog box is found
under the Photoshop main menu. The settings
shown here are set simply by changing the Settings
pull down menu (first red arrow in image at right) from the
Default settings to U.S. Prepress Defaults.
This
changes the all important working
space to Adobe RGB 1998 and sets the
Color Management Policies in the next box as shown here. You
always want to know what color
space your image is currently in and have the ability
to control where it goes. These settings allow that control.
|
|
Soft
Proofing
Step
1: Open
your image in Photoshop
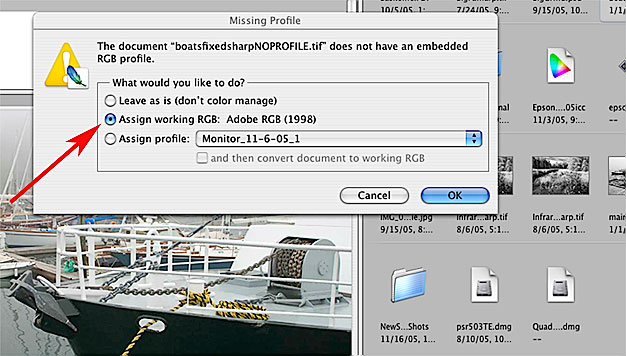
The goal
of this module is to make a print that closely matches your
monitor. That being the case you should assign your image
a profile, in this case our working color space. We set our working
color space to Adobe 1998 under Photoshop's
Color Settings preferences already. Click on the Assign
working RGB button here and proceed by clicking on
OK.
|

|
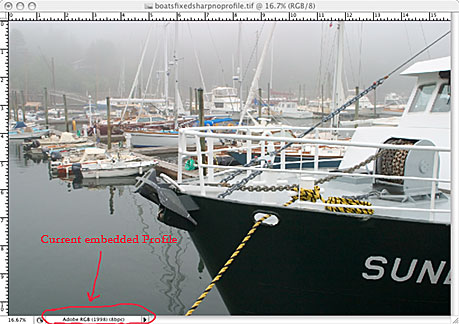
Step
2: Confirm
that the correct profile is embedded in your file.
The small
pull down menu at the bottom left of your image has an option
to display the current embedded profile (the default option
here is document size). Click on the black arrow here and
select Document Profile, it should match your color working space or the profile you opened the image with. It should never be labeled "Untagged".
|
 |
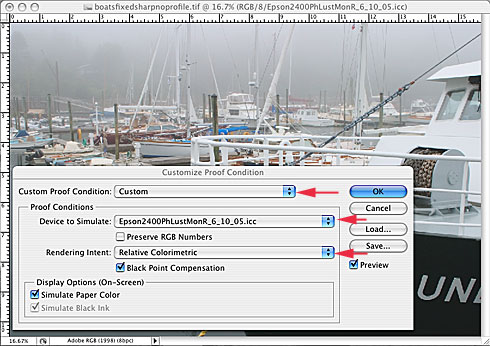
| Step
3: Open
the Proof Setup (Soft Proof) dialog box.
In Photoshop
go to View > Proof Setup >Custom from
the pull down menus. The Proof Setup dialog
box will pop onto the screen as shown. The pull down menus,indicated
with a red arrow here can be changed as shown to select the
profile and the rendering intent you would like to preview on your monitor. In this example we have chosen an Epson 2400 profile with Photo Black Ink and Epson Photo Luster paper. You can change profiles and rendering intents and click ON the Preview button as shown to emulate on your monitor what your image will look like when printed.
This
Soft Proofing method gives you a good idea of what your image
will look like when printed. If it changes dramatically when
you click on the Preview button then you
may have a poor profile or have selected the wrong Rendering
Intent for your image. In this example we have selected
Relative
Colorimetric as our rendering intent. The Paper
White and Ink Black buttons should
be left on as shown. |
|
| This
screen shot is an example of the selection of a different
rendering intent. In this example we have selected Absolute
Colorimetric as the rendering intent. The use of Absolute Colormetric as the rendering intent in this example is not objectionable, the image is a little lighter but does not have a color cast.
When
the other rendering intents were selected and previewed there
was very little change on the monitor. We could assume then
that all of the rendering intents
would produce acceptable color prints with this profile and
printer/ink/paper combination.
|

|
How
to print an image from Photoshop to an Inkjet printer utilizing
an ICC color managed workflow:
Step
1:
Open image in Photoshop.
Assign
working RGB color space as shown in this screen shot.
|
 |
Step
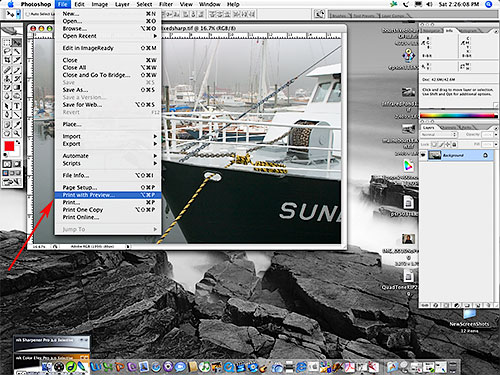
2: Go
to File > Print with
Preview from the Photoshop menu.
|
|
Step
2 cont.: Here's
a screen shot that shows the default Print Preview dialog
box. You do not want to leave the settings as default.. see
next step.
|
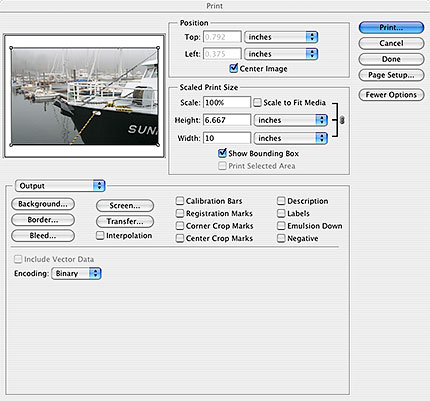 |
Step
3: Select
Color Management from the pull down menu
as shown here, then select the appropriate profile and intent
from the pull down menus under Print Space, again
as shown.
|

|
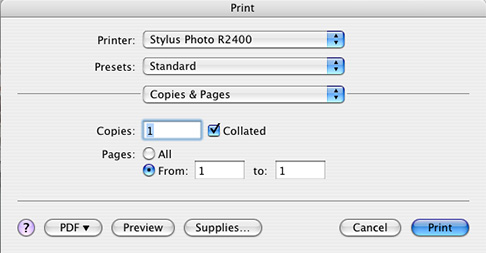
Step
4: Click
on the Print button in the Print with Preview
dialog box.
Doing
so brings up the following Print dialog box.
The screen shot here shows the default settings.
|
|
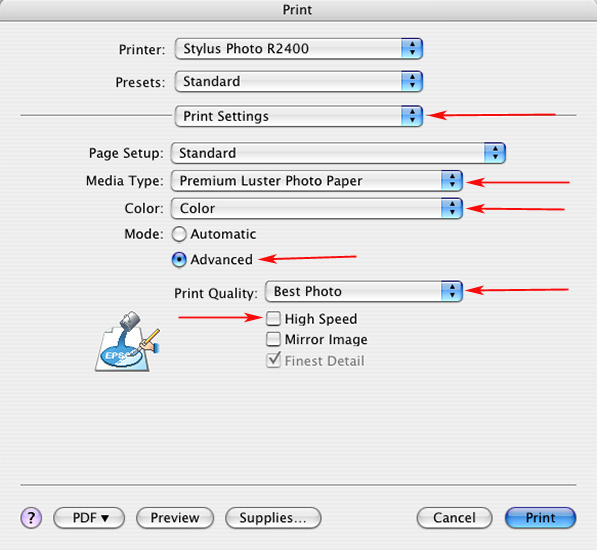
| Step
5: Go
to the 3rd pull down menu in this dialog box and select Print
Settings.
Select
the media (paper) type you are using from the Media
Type pull down menu and Color from
the Color pull down menu.
Click
on the Advanced Settings button to activate
it. Select the Best Photo setting for optimum
print quality.
Click
Off the High Speed button,
again for optimum (best) quality.
|
|
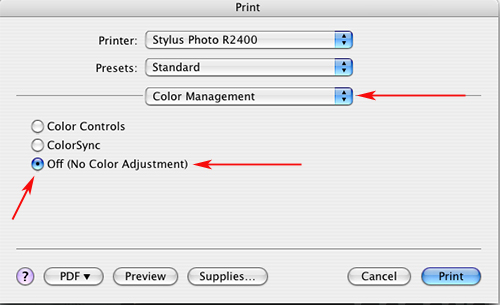
Step
6: Go
to the pull down menu that currently reads Print Settings
and change it to Color Management
as shown.
Click
on the Off (No Color Adjustment) button, doing
so will turn off any color management color conversions the
driver might perform behind the scenes. Photoshop does the
color
conversion for us, we do not want to apply a second driver
controlled color conversion here.
|
|
|
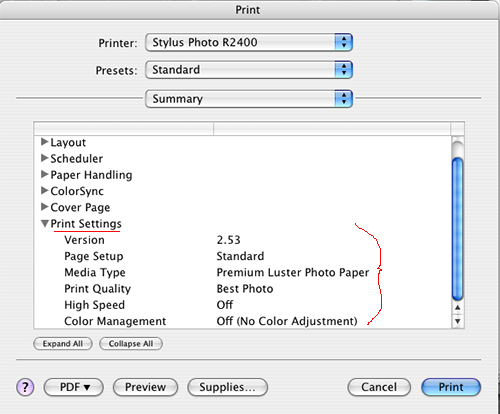
Step
7: Go
to the 3rd pull down menu again and select Summary.
A summary
of all of your print driver selections will now be listed
in the dialog box. This serves as a checklist to verify you
have the right settings selected. If you find anything wrong,
go back and correct it.
If everything
looks OK, click on the Print button to send
the print job to your printer.
|
|
Review
Questions: click
on the correct answer
1) When printing
it is best to set your print driver to "Auto Color" control
so that the printer profile is used to correctly convert your images
colors?
2) If everything
is done correctly, the "Soft Proof" of your image on the
monitor should exactly match the printed image?
3) It is a
good idea to convert your images to a device-independent working
color space like "Adobe 1998" before printing.
4) If you do
not have access to software and hardware to create a custom printer
profile it is best to set all of the color controls in the print
driver to automatic.
______________________________________________________________________________________________________
|
