section1
color introduction
whats color
color accuracy
color perception
 
color temperature
color models
icc workflow
color tools
 
printers
photoshop


Profiling a Scanner

Module Objective: At the completion of this module you will be able to calibrate (if possible) and profile a flatbed scanner utilizing given hardware and software tools.

You might wonder why you would need to or want to calibrate and profile your flatbed or film scanner? Most photographers that work with digital images, open and edit their images with Adobe Photoshop. In Photoshop the image can be corrected and adjusted to obtain optimum brightness, contrast, color balance, etc. so why bother calibrating and profiling your scanner?

The decision to color manage your scans is really a workflow issue. A properly calibrated and profiled scanner will save you time and effort. For example if you are scanning color positive images (slides) most likely your slides are already properly exposed and color balanced, if you simply want these images in digital form and do not need to adjust them in Photoshop then you would certainly want to color manage your scanner, this is assuming of course that your time is valuable! The thought process here is that your input (original) can and should closely match what you get out (output/scan). It is much better from a workflow and image quality stand point to obtain an optimally scanned image by utilizing a profile and ICC color workflow than it is to scan an image without a profile and make color and tonal adjustments in Photoshop after the fact. Why not get it right from the beginning?

Please note however that film negatives will benefit from calibrated but not profiled scanners. The color information in a negative is the reverse of what you want in a scan and it also contains an orange mask. You cannot make custom profiles for color negative films. You can however make use of color negative lookup tables. These negative lookup tables are similar to profiles in that they describe the color characteristics of a particular film emulsion, IE: Kodak Portra 400, Fuji Velvia, etc. and will help you obtain more accurate color from your color negative scans.

Scanner Types:

There are quite a variety of scanners and scanner manufacturers in the market today. We are not going to discuss or go over all of the different options available but do want to discuss film vs. reflective calibration and profiling.

Calibration: Many scanners both flatbed and film come with a calibration target and software that will let you calibrate (bring to a known value) your scanner. Often times the industry refers to this as linearizing the device, which really is the same as calibrating it. If this option is available to you, then by all means do it. It is always a good idea to start from a known value or standard. Regular calibration will also enable you utilize the same scanner profile because you'll always have the ability to return the scanner to it's original state.
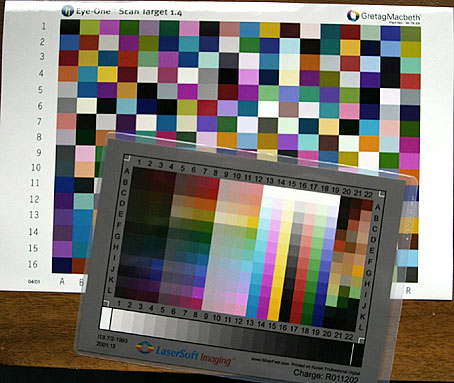
The targets used to calibrate and profile scanners are often times similar or the same. Some devices and or profiling software applications come with custom targets while others use popular targets made by Kodak, Agfa, Fuji and others.

The Kodak "IT8" target is a well known and often used target. The manufacturers of these targets also provide reference files (usually simple text files) that include the LAB values for each color patch. These values serve as a reference point for the color values attained when the target is scanned. A point of comparison if you will, that is used to create a calibrated state or generate a custom profile.


Tools:

  • Apple G4 Computer
  • OS 10.2.6
  • GretagMacbeth Eye-One Spectrophotometer
  • Eye-One Match software
  • Epson 1680 Scanner

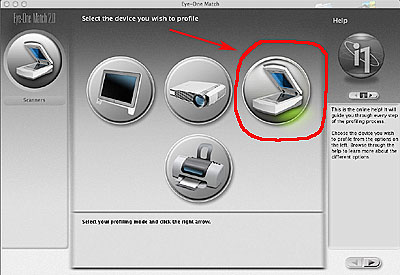
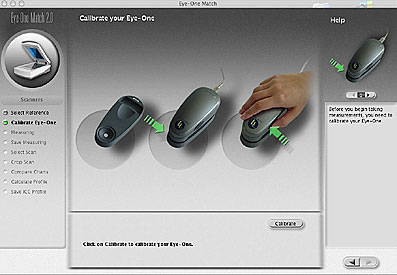
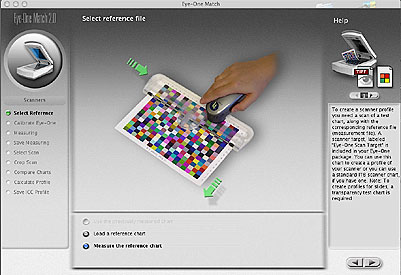
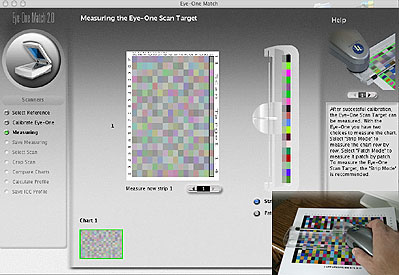
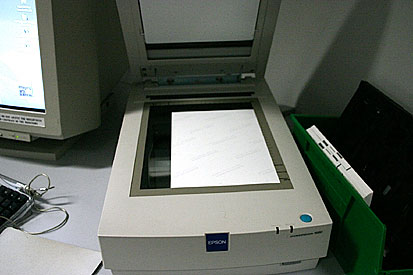
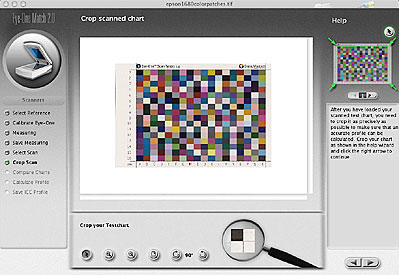
Step 1: Make sure the scanner has been on for at least 15-30 minutes so that the lamp has stabilized before scanning.

Step 2: Calibrate your scanner if possible, this will be a built in routine and the software will generally walk you through the process. The scanner we are demonstrating here does not have a calibration routine.

Step 3: Open Eye-One match software, select scanner as the device to profile.


Step 4: Calibrate the Eye-One spectrophotometer. This spectrophotometer comes with a white plaque specifically for calibrating it. The plaque is built into it's holder, simply place the unit in its holder and select calibrate from the software. Calibrating the device each time like this ensures accurate readings.


Step 5: Measure the scanner reference chart/target. The Eye-One application comes with a scanner target. This target can be read by the Eye-One spectrophotometer, this ensures very accurate reference data for a more accurate scanner profile.


Step 6: Measure the scanner target one strip at a time with a plastic guide. Take your time making these readings, if you go too fast you'll receive an error.


Step 7: Save measurement data. Save the target values. This file should be saved to a folder so that it can be easily retrieved later as a reference file.


Step 8: Scan the scanner target.

Make sure that the scanner glass is clean and dust free. It is also critically important that the scanner is set to its default settings. Turn off unsharp masking if available and make sure that the scanning software does not embed a profile.

Save the scanned file as a "tiff", full size at no more than 200 pixels per inch.


Step 9: Load the scanned target file. Select the file you just scanned and saved.


Step 10: Crop the scanned target file so that it fits tight to the crop lines in the software. Rotate the file if necessary to match the sample image in the help window.


Step 11: Do a quick check to make sure that the scanned chart looks like the original measured chart. If it does not you've done something wrong, back track and fix it.


Step 12: The software will now create a custom profile for your scanner based on a comparison of the scanned target file color values versus the measured target color values.


Step 13: Save the new scanner profile. Give it a name that you can remember and add the current date.


Step 14: Use the new profile. In Adobe Photoshop you can assign the new scanner profile to your image if you have not or could not do so from the scanning software. Many scanners will let you embed a scanner profile.

In this example I have opened the image in Adobe Photoshop and assigned the scanner profile, to do so, go to the top menu in Photoshop and select Image > Mode > Assign Profile from the pull down menu. Click on the Profile button and select your scanner profile, click OK when finished.


Step 15: Convert the images color space to your working space (Adobe 1998). You will most likely want to do some work on your image in Photoshop. It is best to edit your image in a larger color gamut color space than that of your scanner. In this example I have converted the image to Adobe 1998.

To convert the image from the scanner profile to Adobe 1998 go to the top menu in Photoshop again and select Image > Mode > Convert to Profile.


Excellent job! You've reviewed the steps needed to profile your scanner. Before you move onto the next module please complete the following review questions. These questions will determine how well you remember and understand this information. If you have trouble with these questions you may want to take another look at this information before moving on to module 3.


Review Questions: click on the correct answer


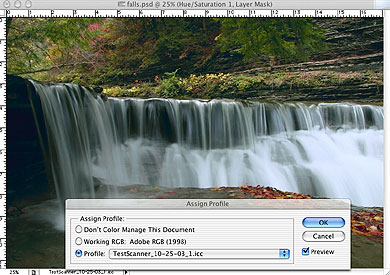
1) You should always embed a profile with the scanned target file.


2) If possible you should calibrate your scanner after creating a profile for it.


3) You cannot create a custom negative film profile for for your scanner.


4) The scanner target reference file contains the numeric color data found in a profile.


Good job, if you did well on these questions your ready to move onto module 3.... "Profile your Printer".

______________________________________________________________________________________________________


Sect. I| ColorIntro.| WhatsColor|ColorAccuracy| ColorPercept.| ColorTemp.| ColorModels| ICCWorkfl| ColorTools|

Sect. II| Monitors| Scanners| Printers| Photoshop|

Site Feedback Form ?'s or Comments email: med2823@rit.edu